Activity Idea: Making MyPlate Plates

MyPlate is an excellent tool to encourage balanced eating.

For visual learners, having an image of MyPlate is a great starting point on the road to healthful eating habits. You can take this image even farther in an interactive project. Not only will this project help cement the basics of MyPlate in the minds of your visual learners, but it will also draw in your kinetic learners as well. Almost everyone can benefit from learning by doing!

So, what’s the project? Making a physical MyPlate plate.

There are a bunch of ways to approach this, but I want to point you toward a few of my favorite styles…
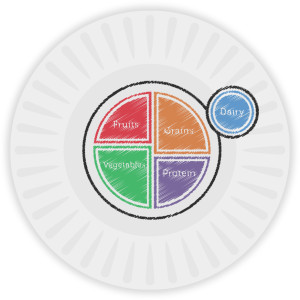
Color a Paper PlateApproach #1: Color a Paper Plate

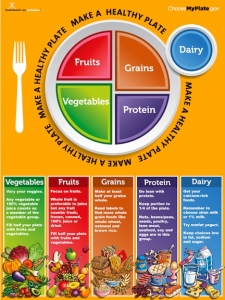
This one is pretty self-explanatory. Display an image of MyPlate and walk your clients through the basics of how and why the plate is divided. After that, you can distribute paper plates to each of your participants and let them create their own MyPlate plates with crayons or markers. They can draw their designs right on the plate!

Be sure to choose crayons or markers that are safe for kids — these won’t have harmful chemicals that could be dangerous to ingest. Not that a lot of anything would transfer from the plate to the food placed on it, but it’s best to play it safe.

If you’re distributing food as part of the activity, have people use their plates to portion out what they eat. They may want to make several MyPlate plates so that they can use the guide a few times. After all, paper plates don’t last past one meal.

Materials needed: A MyPlate image example, paper plates, and markers or crayons

Use the Plates Again and AgainApproach #2: Create Melamine Plates

To help your clients make MyPlate plates that they can use again and again, create melamine plates. These plates are embedded with the images that people draw, and they’re reusable. In fact, they can be treated just like regular plates — without fear of flaking, fading, or general destruction.

To create these plates, you’ll need a Make-A-Plate Kit with specialized markers. Hand out the plate papers from the kit to your clients after your discussion of MyPlate, and then let them use the markers to create their own MyPlate images.

This is a relatively inexpensive project that produces long-lasting results.

There is one thing to be aware of, however, and that is production delays. It often takes 2-3 weeks to return the MyPlate drawings as physical plates, so be sure to plan for this holdup.

Materials needed: A MyPlate image example, melamine plate kits, melamine plate markers, materials for shipping the plates

Approach #3: Paint Pottery Plates

For more immediate results and a long-lasting plate, there’s always painting pottery. Yes, this is a generally more expensive and involved approach than the other two, but it also often produces beautiful results. You can turn the project into a festive outing or party, and it makes a great end-of-session finale.

Hanging a MyPlate poster or enlarged drawing in the studio can help inspire your participants as they work. It also offers a great example to guide their painting.

Materials needed: MyPlate image example, a pottery studio, potted plates, paints and brushes

Try Word ArtDetails: Creating the Plates

Now that we’ve discussed a few general ways for your clients to make their own MyPlate plates, let’s get into the specifics of plate creation.

Make sure that there is an image of MyPlate available for your participants to look at as they create their plates. After all, the goal is to have an accurate guide to balanced eating available for their reference. A MyPlate with the wrong proportions on it is not helpful.

Now, when it comes to drawing the plate within the guidelines set forth by the USDA, there is plenty of room for innovation.

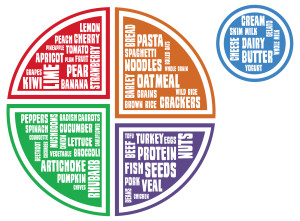
Yes, clients could copy the MyPlate image exactly “as is” from the USDA website, but they could also innovate when it comes to decorating the plates. For example, some participants could use pictures to highlight what goes in each section, drawing images of their favorite foods from each food group. Or each section of MyPlate could become a word cloud (as pictured here). This word cloud can also feature the foods that fit into each food group.

The possibilities are endless!

Examples, Giveaways, Prizes, Shortcuts, or Take-Home Ideas for Clients

Of course, if you’re looking for examples, giveaways, prizes, shortcuts, or take-home ideas for clients, then you need look no further than the Nutrition Education Store. At the store, you can purchase…

These are wonderful examples that people can pass around while they create their own MyPlate plates. The plates also make perfect prizes for giveaways and can be distributed as take-home ideas for clients. Plus, if you don’t have the time, budget, or resources to have participants make their own plates, these plates offer a fantastic shortcut.

So. There you have it. A bunch of ideas for a great MyPlate project. Enjoy!

By Judy Doherty, PC II and Founder of Food and Health Communications, Inc

There’s always more in the store. Check out these fantastic MyPlate resources!

MyPlate Poster

MyPlate Wristbands

MyPlate PowerPoint Presentation

MyPlate Handout for Kids

MyPlate Apron

Do as I do—Demonstration tips

People love cooking classes and food demonstrations.  So why not use this interest to teach more than recipes or cooking techniques? You can teach food safety by using good practices.

Think of the class or demo as the “teachable moment”–that’s the time that is just right for someone to learn something.  Think about your audience. Are you teaching a newly diagnosed diabetic, or a group of seniors, new cooks or maybe a pregnant women or parents of young children.  All of these are people that should be more aware of food safety because they (or their family members) are more susceptible to a foodborne illness.

If you have guest chefs doing demonstrations for you – encourage good practices.  Sometimes you don’t have control over what a “guest chef” does—a friend of mine cringed the whole time a “guest chef” cut vegetables without washing and taste tested from the pot. Be sure to review with them before you start the food handling practices you expect.

You know the saying “do as I say?”  Well why don’t you make it “do as I do,” too?  People mimic each other and will learn healthful techniques if they see you practicing what you preach.

Here are some basic ideas to keep in mind.

  • Wash your hands before you cook. Make it obvious.
  • Watch your clothing and jewelry. Avoid long sleeves, watches, rings, bracelets, and earrings.
  • Avoid bare hand contact with ready-to-eat food and explain why you aren’t touching it.
  • Use separate cutting boards for ready-to-eat and raw foods. Different colors are a plus.
  • Keep foods refrigerated or in coolers until you’re ready to use them.
  • Follow the “two-hour” rule. Don’t allow folks to eat food that has been sitting at room temperature for more than two hours.
  • Wash fruits and vegetables. Again, make it obvious.
  • Use a food thermometer. Demonstrate how to use it and encourage its use for all foods, not just meats.
  • Don’t lick the beaters.
  • Don’t put the tasting spoon in the food or stand over the food while tasting.
  • Don’t lick your fingers.
  • If you’re wearing gloves, use care to keep them clean. Change the gloves when you change tasks. Wash your hands before you put your gloves on.
  • Don’t use your phone while you’re wearing gloves.
  • Don’t play with your hair.
  • If you’re serving samples, kept them at the proper temperature and make sure the serving utensils are clean.
  • If you’re only partially cooking something due to time, do not allow people eat this food before it is thoroughly cooked.

I know you think some of these are simple and basic—but I think I’ve seen each of these done by a cooking teacher or food demonstrator.

If you’re passing out recipes—at a demo or any time—make sure they include food safety tips. Include appropriate cooking temperatures along with storage temps and how long you can keep the food.

Cheryle Jones Syracuse, MS

Professor Emeritus, The Ohio State University


Just a poached egg

I like to teach with stories.  I think people learn more and remember it if they relate a topic to a real-life experience. Sometimes telling one story can lead to others and people can personalize the topic. Hopefully this will help them remember and make use of this knowledge.

When teaching food safety we always get to the topic of raw or undercooked eggs.  Here’s the story I tell….

One day I went to visit my 98 year old great aunt who was living in a nursing home. She shared a frustration with me. She had asked the dietary staff if she could please have a poached egg. She wasn’t feeling well and remembered her mother cooking her poached eggs when she was sick. She was looking for a comfort food.

She was told that she could only have a poached egg if she signed (as she called it) a piece of paper saying that she knew she might get sick(er) if she ate this egg.  First off, she was legally blind and really couldn’t read this paper they gave her. Secondly, she wasn’t feeling well, just wanted a poached egg and didn’t really want to be bothered with a paper.  She was confused and didn’t understand.

She didn’t get the egg.  This makes me sad.

What’s the background here?

Rightfully, the nursing home staff was concerned about this elderly and sick person contracting salmonellosis from an undercooked egg. I applaud them for this concern.  At her age a case of salmonellosis could be very risky.

For the average healthy adult the risk of getting sick from a Salmonella contaminated egg is very low. It is estimated that as few as three in 10,000 eggs are contaminated. (http://foodsafetytalk.com/ #156)

Typically, people infected with Salmonella develop diarrhea, fever, and abdominal cramps between 12 and 72 hours after infection. The illness usually lasts 4 to 7 days, and most individuals recover without treatment.  In some cases, diarrhea may be so severe that the patient needs to be hospitalized. Salmonella ranks second of all foodborne illnesses in the United States. It’s important that remember that children, the elderly, pregnant women and those people with weakened immune systems are more susceptible to a food borne illness such as this and need to be more concerned.

One way to reduce the risk from Salmonella bacteria is to thoroughly cook eggs until 145 degrees F.  At this temperature both the whites and yolks are firm. Yes, this means the yolks should not be runny. This rules out sunny-side-up, over-easy, soft boiled, runny scrambled and my aunt’s beloved poached egg. For dishes containing eggs like quiche and souffles, they should be cooked until an internal temperature of 160 degrees Fahrenheit is reached.

What could they have done? There is an alternative –but does cost a little more. The answer is pasteurized shell eggs. These eggs have been heat treated so that they can be served undercooked without a risk.

I’ve had many nursing home and assisted living employees in my classes and frequently they tell me that they do use pasteurized eggs and offer poached and other eggs with “runny yolks” to their residents.  I’m glad to hear this.

I should have dug a little deeper into the situation, asked a few more questions and been a better advocate for my aunt.

Hopefully, my telling this story gives my students a chance to think about their choices, their options and the risks they take.

Cheryle Jones Syracuse, MS

Professor Emeritus, The Ohio State University


Is it TWO or FOUR?

This is something that’s been bugging me.  I teach food safety, primarily to food service managers and folks that work in restaurants.  Occasionally I do work with consumer groups. If you teach these topics you know that there are a couple differences in what we teach the restaurant folks vs. what we teach consumers.  Why?

According to the FDA Food Code food service operations are allowed to keep TCS (or potentially hazardous)  food in the temperature danger zone (TDZ) of 41 degrees to 135 degrees F for up to FOUR hours.

But, when you teach it to consumers it’s the TWO HOUR RULE.  According to the United States Department of Agriculture: “Never leave food out of refrigeration over 2 hours. If the temperature is above 90 °F, food should not be left out more than 1 hour.” https://www.fsis.usda.gov .

And if you really want to get “picky” their TDZ  is a bit different, too. They say 40 degrees to 140 degrees F.

Food doesn’t instantly go bad at either two hours or four hours. Again, according to the USDA  “leaving food out too long at room temperature can cause bacteria (such as Staphylococcus aureus, Salmonella Enteritidis, Escherichia coli O157:H7, and Campylobacter) to grow to dangerous levels that can cause illness. Bacteria grow most rapidly in the range of temperatures between 40 °F and 140 °F, doubling in number in as little as 20 minutes.”

Why the difference?  I don’t really have an “official” scientific reason. According to the folks at the USDA Meat and Poultry hotline they are leaving an abundance of caution with the conservative consumer recommendations.

While teaching I try to explain to folks that the four hours allowed for restaurants/food service is making the assumption that these folks are following recommended FDA food safety practices. These include lots of  hand washing and gloves,  use of sanitizers, working to prevent cross-contamination and using timers and thermometers.

This conservative approach might be a great idea for consumers. A lot of things can happen (or not happen) in a home kitchen.  I’m hoping that they do wash their hands before cooking and do use some good food safety procedures.  Not many folks in home kitchens use sanitizers but let’s hope they use lots of hot soapy water. Does the dog or cat climb on that counter when they are alone in the house?  Did mom get called away and thinks it’s two hours, when really it was more?  Food in restaurants are delivered in refrigerated trucks and put away quickly, while sometimes food stays in the TDZ longer than planned between the grocery store and the home refrigerator. I also wonder how many home refrigerators have thermometers.

What I  think is really important…if it’s two or four…. follow good food safety practices all of the time.

Cheryle Jones Syracuse, MS

Professor Emeritus, The Ohio State University


Recalls in the news

I know people on Facebook are just trying to be helpful….but they also spread fear and concern.  Twice within the last week I’ve gotten a “FLASH NEWS ALERT” about a recall of shredded cheese due to Listeria. There were many “shares” on this post and also many people commenting that they were afraid and pitching the cheese in their refrigerator.

I try hard to keep up on food safety topics in the news and hadn’t heard anything about a new recall. So, I checked it out at the government’s food recall website FoodSafety.gov . This site provides food safety and food recall information from both the Food and Drug Administration (FDA) and the U.S. Department of Agriculture (USDA).  At this website you can also sign up for alerts to be sent to your smart phone or email.

The FDA is responsible for about 80% of the food eaten in the United States. The Food Safety Inspection Service of the USDA monitors meat, poultry and egg products produced in federally inspected establishments. The web site will direct you to which agency is specifically involved with the recall and alert.

If there is a multistate foodborne illness outbreak, the Center for Disease Control and Prevention (CDC) serves as the lead coordinator.  You can follow these outbreaks and the investigations on the CDC website https://www.cdc.gov/foodsafety/outbreaks/

According to the FDA website, they only seek publicity about a recall when they believe the public needs to be alerted to a serious hazard.  There are three recall classifications. Class I has the highest risk when the public is at risk for a serious health problem or death including biological pathogens and food allergens. When you look at the list of recalls it’s interesting to note that many of them are related to undeclared allergens, mislabeling or foreign matter in the food. Not all are recalls are linked to foodborne illness pathogens.

It is wise to protect yourself—pay attention to food recalls and check your refrigerator, freezer and pantry for these products.

The foodsafety.gov site lists recent as well as archives older recalls.  There has been nothing since last year on cheese.   I guess it just takes that long for some of these posts to get around.

It’s always worth a double check before pressing that “share” button spreading fear to your family, friends, students and clients!

Cheryle Jones Syracuse, MS

Professor Emeritus, The Ohio State University

Health Fair Planning Guide

Health Fair Planning Guide – Health Fair Activities – Health Fair Banner

Freebie Alert! This post is packed with free health fair activity ideas, free health fair handouts, and free health fair planning resources. Use it to make your next health fair or wellness fair a success.

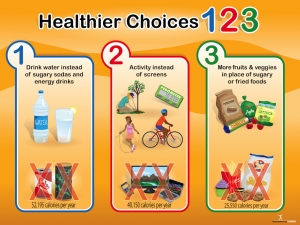
Cheryl Bachinski, a school nurse, is planning a health fair and she needs a banner to help people who are constrained by time and money to make better choices for their families who are struggling with their weight. She says they drink too many sweetened sodas, eat too many cupcakes and chips, along with other packaged snacks, and they never exercise. Wait until you see the new banner we created for her. Check it out and you can buy it on sale or use the display idea for your own.

How will you stand out from the crowd at the next health or wellness fair?

Ready for the answer?

It’s all about the booth.

Yes, there are totally committees, special presentations, and deals with vendors, but in our experience, a successful day at a health fair comes down to your booth.

So, that’s what we’re going to address — tips and tricks for putting together the best nutrition education wellness fair booth around.

Objectives:

Wellness and Health Fair Kit

Let’s begin by setting up some objectives for your day at the health fair. Which of the following is an objective you’d like to address? Does the health fair have a preexisting theme?

  • Health awareness
  • Health screenings
  • Immunizations
  • Marketing
  • Community event

If more than one objective applies to you, great! However, if all of them apply to you, you may want to narrow your focus to just 1 or 2 primary objectives that you can use your booth to address.

Resources:

When it comes to big events that require committees and multiple vendors, there are lots of resources to make life easier. Look through the following guides if you’re putting together your own large health fair or wellness event…

Now, back to the booths.

Use our new handy theme-picker to choose the theme that is right for you or read below for more ideas.

Theme Ideas for Children:

Wellness and Health Fair Kit for Kids

If your health fair booth is geared towards children, you will have the best results with simple, colorful, and engaging content. Coming up with those materials and then coordinating them will get a lot easier if you select a single theme for your booth. Some of the most popular themes that we’ve used or observed (and can therefore recommend to you) include…

Theme Ideas for Adults and Older Kids:

Salsa Wellness Fair Kit

Most wellness fairs appear to be geared towards adults these days, so if that’s what you’re working with, consider any of the following tried-and-true themes…

Theme Ideas for Families:

There are many ways that families can team up to improve their health together, but most people suffer from a crisis of imagination and can’t think of a way to implement a healthful habit as a family. Inspire them with these wonderful family-friendly health and nutrition themes.

Building a Great Booth and Activity Center:

So, once you have an overarching objective identified and a theme established, it’s time to get down to business.

Your booth.

Make Your Salad a Rainbow Banner

How can you make it engaging, with activities that draw and hold participants?

Establishing a theme was a great start. So was finding an objective. Use these to guide the nitty-gritty of your booth.

Based on the wellness fair we have participated in, observed, and/or discussed, the most successful booths have balanced a combination of the following…

  • Engaging banner
  • Interactive component
  • Giveaway
  • Resources for more information

If you don’t have space or resources for all four, pick as many as are reasonable and build your balance from there.

So, first up, the banner. There’s a comprehensive post about wellness fair displays, and it has everything you need to know about banners. Of course, you can also save yourself the headache (and multiple trips to the store for supplies) by buying a crowd-tested, scientifically-accurate, and utterly up-to-date banner that matches your vision for the booth.

Next we’re going to tackle the interactive component. Just kidding. We’re going to go really in-depth with that one, so it gets its own section further down. Stay tuned!

Real Food Grows Bookmark

The third element of an engaging wellness fair booth is a giveaway. You can either set up a raffle for a large prize or offer a selection of smaller prizes. Great prize ideas include…

  • Cookbooks
  • Bookmarks
  • App download codes
  • Recipe cards
  • Cooking utensils
  • Exercise equipment (like jump ropes, hula hoops, etc)

You know your audience. What resonates the most with them?

So. Why a giveaway? A giveaway will draw people to your booth, especially if you offer unique prizes and get the word out about your raffle or treat. Once people are at your booth, you can convey the messages that you want to communicate. It’s hard to get the word out if no one comes to your booth!

The final element of a successful wellness fair booth and/or activity center is a way to offer your audience more information. Often people would like to learn more about a topic at their leisure, rather than while standing in the middle of a busy nutrition fair. Handouts, lists of helpful websites, reference materials, or recipe cards are all great resources to have at your booth. That way, people can revisit the keys of your message, making it more likely to stick in their minds.

Great Wellness Fair Activity Ideas:

Prevent the Flu Poster

The interactive component for a wellness fair can be adjusted to fit your space, resources, and audience. Consider…

  • Having passers-by participate in an activity or game (examples below)
  • Setting out food samples. Especially if you’re putting together a healthful cooking or balanced lifestyle booth, little samples of healthful foods to sample (with recipes to match) can be a big hit at wellness fairs. You can also include a survey or do a taste test to have people evaluate different healthful foods.
  • Giving cooking demonstrations.
  • Surveying your audience about their health, habits, goals, etc.
  • Taking health readings. Offer the resources for participants to measure their BMI, waist circumference, blood pressure, etc. Follow-up materials here are a must.

So, want to do an activity? Here are some examples of our favorite health and wellness fair games…

Activity #1: MyPlate Trivia

Divide participants into balanced teams and bring on the trivia. The first team to answer each question correctly will earn a point, and the team with the most points at the end of the game wins.

Question #1: How much of your plate should be filled with fruits and vegetables at each meal?
Answer: Half

Question #2: What should you drink instead of sugary drinks?
Answer: Water or skim milk

Question #3: What are the five main MyPlate food groups?
Answer: Fruits, Vegetables, Grains, Protein, and Dairy

This activity idea offers the perfect way to merge the activity and giveaway elements of your booth. Offer prizes to all participants, or just to the winning team (if you want to incentivize engagement). In lieu of smaller prizes, you can also give away raffle tickets for one of your larger items.

Activity #2: Heart Health Taste Tests

About Your Blood Pressure Poster

Eating well for your heart doesn’t mean giving up all of your favorite foods to go on a taste-free diet, but some clients and patients don’t really understand that point. Bring the lesson home by having a taste test session right at your booth with some of your favorite heart-healthy products or recipes.

Consider a trans-fat-free margarine tasting, for example. Just bring in margarines that contain less than 2 grams of saturated fat and 0 grams of trans fat per serving. Have people who wander by your booth try these items, preferably spread on a bit of whole wheat bread or on a whole grain cracker.

You can also do taste tests with salads that feature veggies that are especially high in fiber, or with various types of quick-cooking oatmeal for a heart-healthy breakfast. You can tailor your tastings to fit the budget and equipment that you have.

Activity #3: What’s the Link?

This activity can be adapted to any theme you’d like. We’re going to outline it with an example — in this case, high-fiber foods.

Display beans, oatmeal, apples, brown rice, canned peas, shredded wheat and whole grain bread (and other high-fiber foods). The question for the display should be, “What do these foods have in common?” The answer of course, is “fiber”! Anyone who guesses correctly can receive a raffle ticket that is good towards a free prize — or a first look at the smaller prizes laid out on the table.

MyPlate Poster

Amazing Handouts for Wellness Fairs:

No wellness or health fair booth would be complete without a handout or five. These can be woven into your display or photocopied and laid out in stacks for people to take home. Today, because it’s Nutrition Month, and because we love you, here are links to 5 amazing and totally free handouts that you can use at your booth.

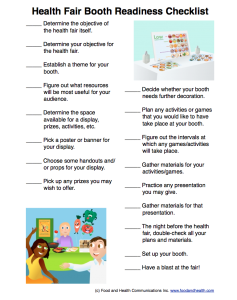
Want a hand getting started? Download this free health fair planning checklist today! This organizational checklist will help you efficient and make the best health fair.

And the best part?

It’s totally free!

Health Fair Planning Checklist


Good luck with your health and wellness fair!

New Year Resource Rundown

Lots of people choose the new year as a time to start fresh. Here are some great links to help you offer your clients everything they need to make 2015 the best year yet!

New Year’s Resolutions:

General Health:

Exercise:

Weight Management:

Resources for You:

And, of course, there’s more in the store!

Shellfish Safety

There’s an old saying that you shouldn’t eat oysters in months that don’t have an “R” in them? That would be May, June, July and August.

The idea behind this may have originally been sound.  These months are summer months when coastal waters where shellfish are harvested are warmer and the risk for bacterial growth might be higher.

The concern behind this warning is Vibrio. This bacterium is a natural inhabitant of unpolluted coastal marine waters that is more prevalent in warmer water. People can get sick from this bacteria and the resulting illness is called vibriosis. The Center for Disease Control (CDC) https://www.cdc.gov/vibrio/index.html estimates that vibriosis causes 80,000 illnesses with 500 hospitalizations and 100 deaths a year. About 52,000 of these illnesses are estimated to be the result of eating contaminated food and the rest are caused by exposing open wounds to brackish or salt water containing the bacteria.

About 80% of Vibrio infections occur between May and October…oops…September and October has “Rs” in them….so there goes that myth.

The reason for the concern is that many people like eating raw or undercooked seafood and shellfish and this can make people sick. Thorough cooking of shellfish will kill these bacteria.

Healthy people exposed to Vibrio may experience nausea, stomach pain, abdominal cramps, vomiting and/or diarrhea. For most healthy people a mild case of vibriosis will recover in about 3 days.

Caution needs to be taken by those with chronic illnesses. At highest risk are those with diabetes, AIDS, cancer, cirrhosis of the liver, stomach or blood disorders. People with alcoholism and liver disease are at extremely high risk.  These people should NOT eat raw shellfish.  Cooked seafood and shellfish is safe for these at-risk people. 

Oysters seem to be the food most commonly linked to Vibrio. An oyster that contains harmful bacteria doesn’t look, smell or taste different from any other oyster. To protect yourself and family members:

  • Oysters should be purchased from approved sources that are inspected and regulated. Oysters harvested from approved waters, packed under sanitary conditions and properly refrigerated are usually safe for raw consumption by healthy individuals
  • If purchasing shellfish to serve raw make sure they are alive. Shells of live oysters will be tightly closed or slightly open. If the shell is gaping open or does not close after tapping it, the animal is dead and may harbor high number of bacteria. Discard any shellfish with open shells. After cooking, only eat shellfish that have opened during the cooking process.
  • Don’t eat shellfish raw that has been shucked or removed from the shell and sold as “shucked” products. These previously shucked products are intended to be cooked before serving.
  • Follow standard food safety precautions of washing hands before handling raw shellfish and avoid cross contamination with raw seafood and cooked foods.
  • Properly cooking shellfish reduces the risk of illness. Oysters, clams, and mussels should be cooked in small batches so that those in the middle are cooked thoroughly. When steaming, cook for 4 to 9 minutes after the start of steaming. When boiling, after the shells open boil for another 3 to 5 minutes. Shucked products should be boiled for 3 minutes, or fried at 375°F for at least 3 minutes or baked at 450°F for 10 minutes. Shellfish should reach an internal temperature of 145 degrees F. They can also be cooked on a barbecue grill to the proper temperature.

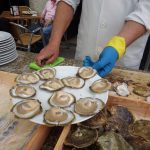
Hog Island Oyster Company's finest

You know how these “old sayings” go… so don’t believe the one about hot sauce or lemon juice either—they DO NOT kill the Vibrio bacteria. Neither does drinking alcohol while eating raw oysters.

If you’re an educator, the folks at Sea Grant http://www.safeoysters.org/ emphasize the importance of education and not frightening the consumers when teaching about seafood.  Remember seafood can be a part of a healthy diet and is good source of low fat protein and Omega 3-faty acids with lots of positive health benefits.  But we do need to remind consumers that eating raw shellfish can be risky and teach ways consumers can protect themselves and specifically those at the most risk.

Cheryle Jones Syracuse, MS

Professor Emeritus, The Ohio State University

It is time for holiday education


Displays for High School

It’s been a while since I shared a reader request in this space, so today let’s talk high school.

Sucu reached out to me recently, and here’s what she wanted to know…

Hello: Do you have any resources or suggestions for a nutrition message for a high school bulletin board you can share asap. Thanks.
Healthy Regards,
Sucu

What fun!

I initially pointed Sucu to a few things we’d already made. There’s a fantastic high school poster set in the store, and a whole 12 lessons for teens program that is chock-full of display ideas for a bulletin board. My team and I have been polishing a STEM (science, technology, engineering, and math) collection that could come in handy too.

But then I thought I’d get more specific.

So, here’s a how-to for two different bulletin board displays for high schools.

Display #1: Skip Sugary Drinks

Teens are drinking a lot of sugary drinks these days, and that can be bad news for their health, both in terms of displacing more nutritious calories and adding excess empty calories to their eating patterns. To help educate teens about what they’re drinking, start with a bright, eye-catching poster that can make up the center of your display. This Are You Drinking Candy? poster is a particularly compelling one, and Beverage Better and Sugar Math are two other good choices, so go with whatever best fits your aesthetic.

From there, take a look at the sodas, energy drinks, and sport beverages that are available at school. Take photos of the Nutrition Facts labels on each one if you can, or print off some labels for equivalent products and highlight the sugar content of each one, along with the serving size. Scatter these images around the poster. You could also measure out the equivalent amount of sugar into these great test tubes and attach the tubes to the board near photos of each drink and its Nutrition Facts.

Fill in the remaining space with more information about the impact of sugary drinks on health. This tearpad has great handouts, and this blog post about energy drinks comes with a free printable handout that would be a good fit for this theme too.

Take a look at our collection of prizes for other resources to make your bulletin board display as engaging and memorable as possible.

Display #2: Nutrition Facts Panel

The Nutrition Facts label is changing, and there’s no reason for teens to stay in the dark. To help them learn what they need to know to use this resource to improve their eating patterns, put together a Nutrition Facts bulletin board!

You can pull a lot of inspiration from the New Nutrition Facts Label Display post that we put together in the spring of 2016.

Combine this Nutrition Facts Poster with a Food Label Handout to center your bulletin board display. Or, if you have more space, this 48-inch by 36-inch Nutrition Label Vinyl Banner would be a great way to draw people over to your display. Add a few different Nutrition Facts labels to the bulletin board, highlighting elements that are either good or bad for the kids’ health (perhaps color-coding would come in handy). Highlight only one or two aspects of each label so that they don’t get overwhelming.

Finish off the board with a few Nutrition Facts Stickers and Nutrition Facts Bookmarks to fill any empty spaces.

I hope this comes in handy for you! Keep those requests coming!


Bulletin Board Idea for Spring

Spring is kicking into high gear, and what better time is there to put together a bright seasonal bulletin board with helpful health messages?

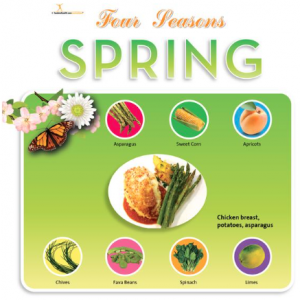
I created this Spring Bulletin Board Banner to highlight key foods that make their debut in the spring, and as I was looking at it the other day, I decided to outline how to use it to anchor a bulletin board display!

Here are the details…

Put the Spring Bulletin Board Banner in the upper right hand corner of your bulletin board area. Print out the recipe for the healthy spring dinner plate featured on the poster and arrange it next to your banner. Note that this recipe is only available to Food and Health members, so if you haven’t already signed up, take a look at the benefits of membership today!

If you have room for another handout, print out the free PDF that accompanies the Spring Bulletin Board Banner and arrange it on your board too.

Fill the remaining space with images of healthful spring produce. You can print these from the internet, cut them out of magazines, or draw them. You could also add some fun MyPlate stickers, which coordinate well with the color scheme featured on the banner.

What kinds of displays are you making for spring?