‘Tis the Season for a Healthy Mindset

The holidays can be a stressful season of overindulging and overspending. Or they can be an enjoyable time filled with fun, family, and friends.

The difference might just be a healthy mindset.

Our Healthy Mindset poster reminds your students, employees, or clients to focus on the everyday simple habits that add up to a healthier life.

During the holiday season, you can help them tailor their healthy mindsets to account for the challenges they’ll face.

Here’s what a healthy holiday mindset might look like:

  • Drink Water: Make it your policy at holiday parties to ask for water with a twist of lemon or lime.
  • Sugar Be Scarce: Make a plan and stick to it. When will you indulge in a treat? How much will you have?
  • I Can Do It: Make this your mantra throughout the season. If staying healthy over the holidays is your priority, say it out loud every day.
  • Make a Healthy Plate: Keep MyPlate in mind whenever you eat. Fill your plate or bowl accordingly, with lots of fruits and vegetables.
  • Sleep Enough: Sticking to your sleep schedule will help you keep your healthy holiday mindset!
  • Never Quit: If you overindulge (it happens!), get back on track right away.
  • Try New Foods: Balance out special holiday foods with some things you wouldn’t normally choose, like extra salad, more vegetables, or fruit for dessert.
  • Move More: Fit exercise in wherever you can. Take an extra lap around the mall, walk after dinner, do crunches during TV commercials.

By Hollis Bass, MEd, RD, LD

PDF Handout: Healthy Holiday Mindset

The Art of Advertising Healthy Food

Are you looking for a beautiful way to advertise healthy, fresh food? Our food art posters are the answer!

These one-of-a-kind masterpieces combine professional photography with motivational messages that will make you want to drop everything and go to the nearest fresh produce market.

Here are a few of my current favorites:

  1. Shine a Light on Veggies features a stunning still-life of asparagus spears. Asparagus is in season in many parts of the country, so what better time to increase its exposure with this gorgeous poster?
  2. Brighten Your Basket reminds you to fill your supermarket cart or farmer’s market basket with fresh produce like those pictured: onions, avocados, Meyer lemons, radishes, and baby bok choy.
  3. Bring the Farm to Your Table says it all with a beautiful display of fresh baby carrots, beets, potatoes, chard, and asparagus.
  4. Nature’s Fast Food’s juicy peaches and bright red cherries will have your mouth watering for these summer tree fruits!
  5. Grown, Not Processed is the ultimate advertisement for choosing a variety of colorful, fresh fruits and veggies. It promotes beets, garlic, peaches, fennel, radishes, carrots, greens (kale, lettuce, parsley), portabella mushrooms, and oyster mushrooms.

Framing these food art posters will give your office or waiting room an upscale feeling. But they’re also affordable enough to be used (framed or unframed) in cafeterias, hallways, and classrooms.

By Hollis Bass, MEd, RD, LD

Vacation Right, Vacation Light

It seems like everyone in America is taking or planning a vacation – or at the very least, talking about how much they want to get away!

Whether it’s a road trip or a cross-country flight, vacations tend to interfere with healthy eating and exercise habits.

Our Vacation Light materials are just what you need to help people keep their vacations as healthy as possible. In a light-hearted way, they show the difference between an Eat a Lot/Sleep a Lot vacation and an Eat Smart/Exercise Your Heart vacation.

Here’s a 3-step plan to teach students, clients, or employees about taking a healthy vacation:

  1. Create a bulletin board display using our Vacation Light poster.
  2. Plan a series of social media posts with Eat Smart/Exercise Your Heart vacation tips.
    • Use these posts to promote step 3.
    • Ask your followers to leave a comment about how they keep their vacations healthy.
  3. Teach a webinar using our Vacation Light PowerPoint show.
    • Have attendees set one goal for their vacation (eat a healthy breakfast daily, track my steps, snack on raw veggies, etc).
    • Invite attendees to report back when they return from vacation.

By Hollis Bass, MEd, RD, LD


Got Gas?

Beans are frequently touted as a great source of low-fat protein along with fiber.  But, many people have an embarrassing problem with beans.  This is one of those topics people don’t talk about…..gas.

One specific sugar in beans —oligosaccharide—tends to be the culprit. It’s just not broken down and absorbed like other sugars.  When beans get into the digestive system this sugar starts to ferment—making gas.

There are a few things you can do to help reduce the gas:

  1. Easy does it. If adding beans or other high fiber foods to your diet start slowly. Let your body adjust slowly. Be sure to include beans on a regular basis, a couple of times a week at first and then more often.  The more you eat, the less gas will be a problem.  The 2015-2020 Dietary Guidelines for Americans recommend we eat 1 ¼ to 1 ½ cups of legumes (beans and peas) each week.
  2. Soak well.  If using dried beans soak them for at least 48 hours. Change the water at least once during the soaking. Rinse well before cooking and use fresh water for cooking. Cook until very tender.
  3. Cook canned beans a little more, too. Rinse canned beans. This also helps to reduce the sodium.
  4. Use an over-the-counter enzyme supplement that can help break down the gas-producing sugars.
  5. Experiment with different types of beans, some people tend to react to different varieties.
  6. While there is no research to prove this works, some people swear that adding herbs and spices while cooking can help. Try a tablespoon of fennel, cumin, ginger, a Mexican spice called epazote or an Indian spice ajwain to a pot of beans.  Even if it doesn’t help with the gas problem, the bonus is….. you’ve tried a new flavor!
  7. Start the digestion in your mouth by chewing a lot. Slow down your eating and chew. This can help breakdown the carbohydrates.
  8. Drink plenty of water. This helps your digestive system handle the increased fiber. The Dietary Guidelines for Americans suggest 25-38 grams of fiber per day for most adults. And research indicates that a high-fiber diet helps you have a healthier digestive tract, physical health, and even mental health.

One more bean tip:  many grandmothers used to put baking soda in their bean water while cooking—some saying this helps to reduce gas. While baking soda does help make the beans tender, especially if you have hard water, this comes with a cost. Adding baking soda causes the beans to lose some vitamins.

Cheryle Jones Syracuse, MS
Professor Emeritus, The Ohio State University


Just a poached egg

I like to teach with stories.  I think people learn more and remember it if they relate a topic to a real-life experience. Sometimes telling one story can lead to others and people can personalize the topic. Hopefully this will help them remember and make use of this knowledge.

When teaching food safety we always get to the topic of raw or undercooked eggs.  Here’s the story I tell….

One day I went to visit my 98 year old great aunt who was living in a nursing home. She shared a frustration with me. She had asked the dietary staff if she could please have a poached egg. She wasn’t feeling well and remembered her mother cooking her poached eggs when she was sick. She was looking for a comfort food.

She was told that she could only have a poached egg if she signed (as she called it) a piece of paper saying that she knew she might get sick(er) if she ate this egg.  First off, she was legally blind and really couldn’t read this paper they gave her. Secondly, she wasn’t feeling well, just wanted a poached egg and didn’t really want to be bothered with a paper.  She was confused and didn’t understand.

She didn’t get the egg.  This makes me sad.

What’s the background here?

Rightfully, the nursing home staff was concerned about this elderly and sick person contracting salmonellosis from an undercooked egg. I applaud them for this concern.  At her age a case of salmonellosis could be very risky.

For the average healthy adult the risk of getting sick from a Salmonella contaminated egg is very low. It is estimated that as few as three in 10,000 eggs are contaminated. (http://foodsafetytalk.com/ #156)

Typically, people infected with Salmonella develop diarrhea, fever, and abdominal cramps between 12 and 72 hours after infection. The illness usually lasts 4 to 7 days, and most individuals recover without treatment.  In some cases, diarrhea may be so severe that the patient needs to be hospitalized. Salmonella ranks second of all foodborne illnesses in the United States. It’s important that remember that children, the elderly, pregnant women and those people with weakened immune systems are more susceptible to a food borne illness such as this and need to be more concerned.

One way to reduce the risk from Salmonella bacteria is to thoroughly cook eggs until 145 degrees F.  At this temperature both the whites and yolks are firm. Yes, this means the yolks should not be runny. This rules out sunny-side-up, over-easy, soft boiled, runny scrambled and my aunt’s beloved poached egg. For dishes containing eggs like quiche and souffles, they should be cooked until an internal temperature of 160 degrees Fahrenheit is reached.

What could they have done? There is an alternative –but does cost a little more. The answer is pasteurized shell eggs. These eggs have been heat treated so that they can be served undercooked without a risk.

I’ve had many nursing home and assisted living employees in my classes and frequently they tell me that they do use pasteurized eggs and offer poached and other eggs with “runny yolks” to their residents.  I’m glad to hear this.

I should have dug a little deeper into the situation, asked a few more questions and been a better advocate for my aunt.

Hopefully, my telling this story gives my students a chance to think about their choices, their options and the risks they take.

Cheryle Jones Syracuse, MS

Professor Emeritus, The Ohio State University


Health Fair Planning Guide

Health Fair Planning Guide – Health Fair Activities – Health Fair Banner

Freebie Alert! This post is packed with free health fair activity ideas, free health fair handouts, and free health fair planning resources. Use it to make your next health fair or wellness fair a success.

Cheryl Bachinski, a school nurse, is planning a health fair and she needs a banner to help people who are constrained by time and money to make better choices for their families who are struggling with their weight. She says they drink too many sweetened sodas, eat too many cupcakes and chips, along with other packaged snacks, and they never exercise. Wait until you see the new banner we created for her. Check it out and you can buy it on sale or use the display idea for your own.

How will you stand out from the crowd at the next health or wellness fair?

Ready for the answer?

It’s all about the booth.

Yes, there are totally committees, special presentations, and deals with vendors, but in our experience, a successful day at a health fair comes down to your booth.

So, that’s what we’re going to address — tips and tricks for putting together the best nutrition education wellness fair booth around.

Objectives:

Wellness and Health Fair Kit

Let’s begin by setting up some objectives for your day at the health fair. Which of the following is an objective you’d like to address? Does the health fair have a preexisting theme?

  • Health awareness
  • Health screenings
  • Immunizations
  • Marketing
  • Community event

If more than one objective applies to you, great! However, if all of them apply to you, you may want to narrow your focus to just 1 or 2 primary objectives that you can use your booth to address.

Resources:

When it comes to big events that require committees and multiple vendors, there are lots of resources to make life easier. Look through the following guides if you’re putting together your own large health fair or wellness event…

Now, back to the booths.

Use our new handy theme-picker to choose the theme that is right for you or read below for more ideas.

Theme Ideas for Children:

Wellness and Health Fair Kit for Kids

If your health fair booth is geared towards children, you will have the best results with simple, colorful, and engaging content. Coming up with those materials and then coordinating them will get a lot easier if you select a single theme for your booth. Some of the most popular themes that we’ve used or observed (and can therefore recommend to you) include…

Theme Ideas for Adults and Older Kids:

Salsa Wellness Fair Kit

Most wellness fairs appear to be geared towards adults these days, so if that’s what you’re working with, consider any of the following tried-and-true themes…

Theme Ideas for Families:

There are many ways that families can team up to improve their health together, but most people suffer from a crisis of imagination and can’t think of a way to implement a healthful habit as a family. Inspire them with these wonderful family-friendly health and nutrition themes.

Building a Great Booth and Activity Center:

So, once you have an overarching objective identified and a theme established, it’s time to get down to business.

Your booth.

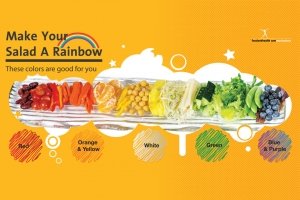
Make Your Salad a Rainbow Banner

How can you make it engaging, with activities that draw and hold participants?

Establishing a theme was a great start. So was finding an objective. Use these to guide the nitty-gritty of your booth.

Based on the wellness fair we have participated in, observed, and/or discussed, the most successful booths have balanced a combination of the following…

  • Engaging banner
  • Interactive component
  • Giveaway
  • Resources for more information

If you don’t have space or resources for all four, pick as many as are reasonable and build your balance from there.

So, first up, the banner. There’s a comprehensive post about wellness fair displays, and it has everything you need to know about banners. Of course, you can also save yourself the headache (and multiple trips to the store for supplies) by buying a crowd-tested, scientifically-accurate, and utterly up-to-date banner that matches your vision for the booth.

Next we’re going to tackle the interactive component. Just kidding. We’re going to go really in-depth with that one, so it gets its own section further down. Stay tuned!

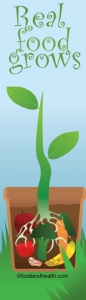
Real Food Grows Bookmark

The third element of an engaging wellness fair booth is a giveaway. You can either set up a raffle for a large prize or offer a selection of smaller prizes. Great prize ideas include…

  • Cookbooks
  • Bookmarks
  • App download codes
  • Recipe cards
  • Cooking utensils
  • Exercise equipment (like jump ropes, hula hoops, etc)

You know your audience. What resonates the most with them?

So. Why a giveaway? A giveaway will draw people to your booth, especially if you offer unique prizes and get the word out about your raffle or treat. Once people are at your booth, you can convey the messages that you want to communicate. It’s hard to get the word out if no one comes to your booth!

The final element of a successful wellness fair booth and/or activity center is a way to offer your audience more information. Often people would like to learn more about a topic at their leisure, rather than while standing in the middle of a busy nutrition fair. Handouts, lists of helpful websites, reference materials, or recipe cards are all great resources to have at your booth. That way, people can revisit the keys of your message, making it more likely to stick in their minds.

Great Wellness Fair Activity Ideas:

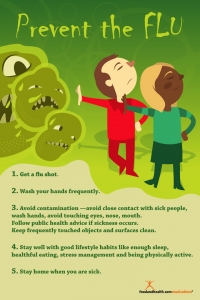
Prevent the Flu Poster

The interactive component for a wellness fair can be adjusted to fit your space, resources, and audience. Consider…

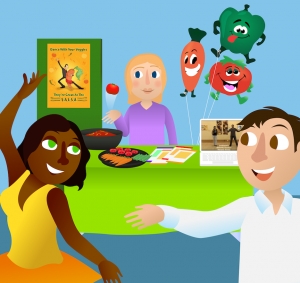
  • Having passers-by participate in an activity or game (examples below)
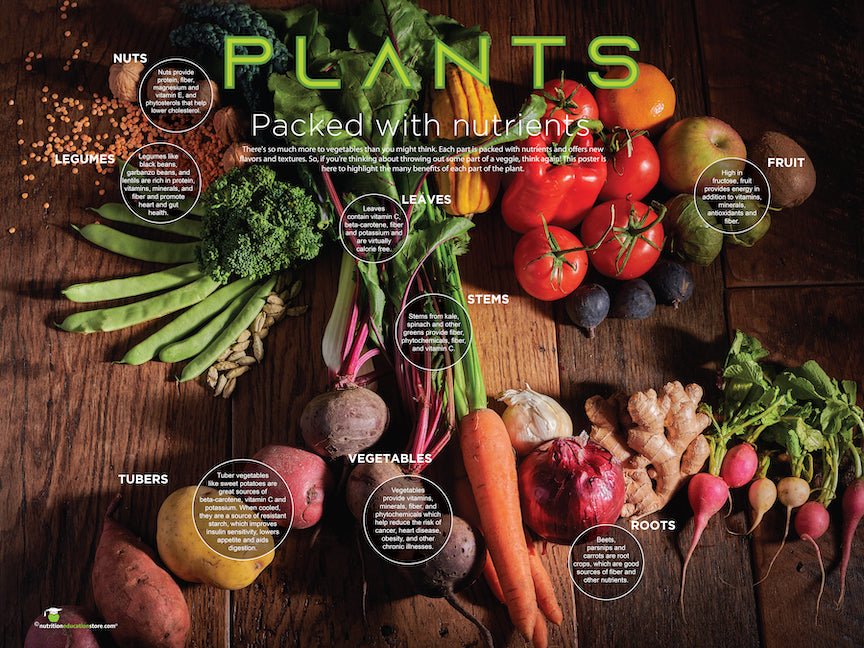
  • Setting out food samples. Especially if you’re putting together a healthful cooking or balanced lifestyle booth, little samples of healthful foods to sample (with recipes to match) can be a big hit at wellness fairs. You can also include a survey or do a taste test to have people evaluate different healthful foods.
  • Giving cooking demonstrations.
  • Surveying your audience about their health, habits, goals, etc.
  • Taking health readings. Offer the resources for participants to measure their BMI, waist circumference, blood pressure, etc. Follow-up materials here are a must.

So, want to do an activity? Here are some examples of our favorite health and wellness fair games…

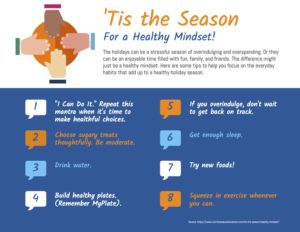
Activity #1: MyPlate Trivia

Divide participants into balanced teams and bring on the trivia. The first team to answer each question correctly will earn a point, and the team with the most points at the end of the game wins.

Question #1: How much of your plate should be filled with fruits and vegetables at each meal?
Answer: Half

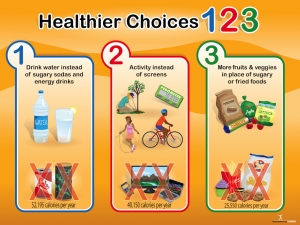
Question #2: What should you drink instead of sugary drinks?
Answer: Water or skim milk

Question #3: What are the five main MyPlate food groups?
Answer: Fruits, Vegetables, Grains, Protein, and Dairy

This activity idea offers the perfect way to merge the activity and giveaway elements of your booth. Offer prizes to all participants, or just to the winning team (if you want to incentivize engagement). In lieu of smaller prizes, you can also give away raffle tickets for one of your larger items.

Activity #2: Heart Health Taste Tests

About Your Blood Pressure Poster

Eating well for your heart doesn’t mean giving up all of your favorite foods to go on a taste-free diet, but some clients and patients don’t really understand that point. Bring the lesson home by having a taste test session right at your booth with some of your favorite heart-healthy products or recipes.

Consider a trans-fat-free margarine tasting, for example. Just bring in margarines that contain less than 2 grams of saturated fat and 0 grams of trans fat per serving. Have people who wander by your booth try these items, preferably spread on a bit of whole wheat bread or on a whole grain cracker.

You can also do taste tests with salads that feature veggies that are especially high in fiber, or with various types of quick-cooking oatmeal for a heart-healthy breakfast. You can tailor your tastings to fit the budget and equipment that you have.

Activity #3: What’s the Link?

This activity can be adapted to any theme you’d like. We’re going to outline it with an example — in this case, high-fiber foods.

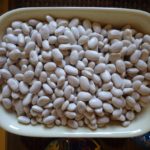
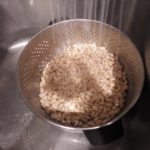
Display beans, oatmeal, apples, brown rice, canned peas, shredded wheat and whole grain bread (and other high-fiber foods). The question for the display should be, “What do these foods have in common?” The answer of course, is “fiber”! Anyone who guesses correctly can receive a raffle ticket that is good towards a free prize — or a first look at the smaller prizes laid out on the table.
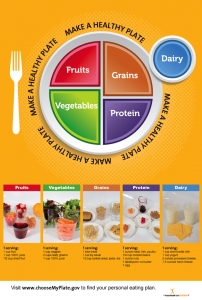
MyPlate Poster

Amazing Handouts for Wellness Fairs:

No wellness or health fair booth would be complete without a handout or five. These can be woven into your display or photocopied and laid out in stacks for people to take home. Today, because it’s Nutrition Month, and because we love you, here are links to 5 amazing and totally free handouts that you can use at your booth.

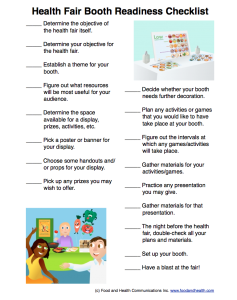
Want a hand getting started? Download this free health fair planning checklist today! This organizational checklist will help you efficient and make the best health fair.

And the best part?

It’s totally free!

Health Fair Planning Checklist


Good luck with your health and wellness fair!

Reader questions onion safety

Question from a reader:  “What information do you have about the idea that onions pose a risk if left in the refrigerator after cutting?  It is something most of us have always done and now there is information floating out there in the internet world that this is not a safe practice.  Thanks for any insight!”

Don’t you just love the internet?  All of these “tales” can cause us to worry about everything!  According to Snopes, this one has been going around since 2008 and there isn’t any scientific proof to support this statement.

Nothing mysterious happens to onions once they are in the refrigerator. Like all fruits and vegetables, once cut, onions should be kept in the refrigerator (National Center for Home Food Preservation and National Onion Association).  I’ll refer you to another article I wrote about Keeping Fruits and Vegetables Safe.

Once a fruit or vegetable has been cut, the barrier to the outside world has been broken and the plant’s natural defenses have been compromised. This opens the food up to the environment. Plus, the moisture and natural sugars in fruits and vegetables help create a great place for bacteria to grow. Refrigerator temperatures, on the other hand, can help slow this development of bacteria. The biggest problem with onions in the refrigerator is the odor.  Be sure to wrap well or keep in a sealed container.

But don’t store your uncut onions in the refrigerator. Whole unpeeled onions should be kept in a cool, dry, well ventilated place. Don’t store them in a plastic bag. Sweet onions tend to have higher water content and are more susceptible to bruising and will have a shorter shelf life than yellow onions. Once peeled or cut, onions should be stored (well wrapped or covered) in the refrigerator at 41 degrees or below.  A peeled or cut onion will be of good quality for 7 in the refrigerator.

If you have a few too many chopped onions they can be frozen. I have frozen leftover chopped  onions (without blanching) for a short time, they are not crisp when thawed, but work great for cooking. Be sure to wrap well.  Use within 3-6 months for best quality. For longer freezer storage, The National Center for Home Food Preservation (nchfp.uga.edu) recommends they be blanched and cooled before freezing.

One final tip: according to the National Onion Association (www.onion-usa.org) it’s the sulfuric compounds  in the onions that cause us to cry when cutting onions. To help reduce this,they recommend chilling the onion before cutting and cutting into the root end of the onion last.

Cheryle Jones Syracuse, MS

Professor Emeritus, The Ohio State University


Is this safe to eat?

Sometimes it’s more a question of quality than safety.  Frozen food is a great example of this. When it comes to freezer burn, this problem is more of a quality issue.  While safe to eat, the quality of freezer burned food may be poor.

But, before I go on, I must stress that the safety of food in a freezer is always based on the fact that the food and the freezer has been at zero degrees or below. If there has been a power outage and/or the food has reached a temperature over 40 degrees at any time while in the freezer, the safety of the food may be in question.

What is freezer burn in the first place?  It is simply the result of air coming into contact with the food while it’s in the freezer.  Usually there is a color change and dry spots develop on the food. Freezer burn may just be dehydration or food may also have an “off flavor”.  While it may not look  or taste appetizing the food is completely safe to eat.  If the damaged area is small, it can be cut off before or after cooking.  If the damage is extensive the food may need to be pitched.

To help keep frozen food from getting freezer burn, there are some fundamental tips:

Re-wrap meats when you come from the store. That thin film found on grocery store meat is not thick enough to keep air from getting in. For best quality rewrap meats with moisture and vapor–proof wraps or bags.  This is also a good time to separate the food into serving-size pieces and remove foam containers to ease defrosting and cooking in the future.

Not all bags are created equal.  Don’t use “storage” bags when you should be using “freezer” bags.  Bread bags and plastic bags from grocery stores are not moisture or vapor proof and will not protect food in the freezer no matter how tight they are wrapped or how many layers have been used.

Air is not your friend. Since air is the real problem, make sure to squeeze as much air out of freezer bags and other container as possible before putting the food into the freezer.  Those vacuum sealers do a good job of getting the air out when freezing foods.

Use freezer quality containers.  Leftover margarine, cottage cheese or sour cream containers are not designed for this purpose and won’t do a good job of keeping that air out. Also, it is not recommended that you reuse the plastic containers and trays that come with microwaveable entrees. Use plastic containers or wide-mouth glass jars specifically designed for the freezer.

Prevent FISH food. Make sure everything that goes into the freezer gets labeled with its name and the date it was frozen.  Often food get stuffed into the back of the freezer and forgotten. Develop a frozen food inventory and practice FIFO—First In-First Out. This will help prevent what food safety experts call FISH food—First In-Still Here.

If care is taken, the quality of frozen fresh foods like meat, poultry, fresh fruits and vegetables will be good for a year.  Precooked foods and leftovers are best if eaten within three to four months. Sometimes veggies with a few freezer crystals, that have been frozen at the proper temperature, can be rinsed under a colander and then steamed. Using up food in the freezer on a weekly basis is a good budget-inducing habit that helps you avoid food waste.

Cheryle Jones Syracuse, MS
Professor Emeritus, The Ohio State University

PS for a fantastic tip on how to use the freezer for planned-over meals see “Was the caterer just here?”

Fresh Local Corn–Enjoy While You Can

We all know that local corn-on-the-cob tastes the best. One of the reasons is that corn’s natural sugars change quickly after harvest causing the corn to lose its sweetness quickly. Corn is one of those great summer farm market treats.

When selecting sweet corn look for husks with good bright green color that are snug to the corn ear and the silk dark brown. Avoid silk with worms or decay. Select ears that are full of kernels. These kernels should be well developed and plump, tender and milky.  If they are too large or too dark they can be tough, chewy and pasty.

For best quality, store corn in the husks uncovered in the refrigerator. If you have corn without the husks, put them in a perforated plastic bag. Corn is best when eaten within two days. After removing the husks and silk, wash the corn in cool running water before eating, cooking or preserving.

Nutritionally corn is a good source of carbohydrates as well as small amounts of Vitamins A and C.  It is sodium-free and low in fat.  Depending upon the size, corn can yield 2/3 to 1 cup of corn per ear. One medium ear of corn contains about 90 calories. Corn provides folate and thiamin as well as fiber.  It can also be a source of zeaxanthin, an antioxidant that may protect against age-related eye disease, such as macular degeneration.

Even though corn is a starchy vegetable, it can still fit into a healthy balanced diet.  According the 2015-2020 Dietary Guidelines for Americans we should try to eat 2-2 1/2 cups of vegetables each day and this can include 5 cups of starchy vegetables a week. https://health.gov/dietaryguidelines/2015/guidelines/appendix-3/ The key here again is balance and moderation and an occasional ear of corn-on-the cob when it’s fresh adds variety.

Instead of the traditional boiled and slathered with butter and salt corn-on-the-cob, try roasting on the grill with a little olive oil. I recently placed husked corn in a zip-top bag with a small amount of olive oil and added an herb blend. I turned the bag over several times to coat the ears with the oil and seasoning.   Then I took the cobs out of the bag and placed the cobs directly on a hot grill turning them several times until the kernels were slightly charred and golden. The flavor was great and there was no need to add extra salt or butter. Do be careful to watch the corn as it cooks, you don’t want it to overcook and dry out.

Judy’s favorite method for grilled corn is to start in the microwave and then finish on the grill at the same time the other items are cooking. That keeps it sweet and from getting tough and burnt. She cooks it in husks or in a covered dish for 2 minutes per ear. See her recipe below for corn salad using leftover cooked corn.

Cheryle Jones Syracuse, MS
Professor Emeritus, The Ohio State University

Here is one of Food and Health Communication’s Favorite recipes for corn:

Fresh Corn Salad

Serves: 4 | Serving Size: 1 cup
Total Time: 15 min | Prep: 15 min | Cook: 0 min

Ingredients:

6 cups dark green lettuce, preferably red leaf
2 ears of corn, shucked and cooked
1 large, ripe tomato
1/2 medium-sized, ripe avocado
1 tablespoon olive oil
2 tablespoons flavored vinegar
Black pepper to taste

Directions:

Cut the lettuce into bite-sized pieces and soak in a large amount of cold water; allow to stand so the dirt sinks to the bottom. Drain the lettuce well in a colander. Place the lettuce in a salad bowl.

Cut the corn off the cob and place on top of the lettuce. Core and dice the tomato and place on top of the salad. Cut the avocado in half, remove the pit and scoop out the flesh from the rind. Dice the avocado and place it on top of the salad.

Chill and cover the salad until ready to serve, up to 3 hours.

When ready to serve, drizzle oil and vinegar over the top and add black pepper to taste.

Serves 4. Each 1 cup serving: 148 calories, 8g fat, 1g saturated fat, 0gtrans fat, 0mg cholesterol, 18mg sodium, 20g carbohydrate, 4g fiber, 4gsugars, 4g protein.© Food and Health CommunicationsAnother article in the blog on Corn-on-the-Cob

Shucks with the husks

Freezing the Taste of Summer

One of the great tastes of summer  is corn-on-the-cob. Lots of people try to retain that great flavor for later in the year by freezing corn when it’s at its peak.

People are always looking for quick and easy ways to do things and the internet tends to perpetuate this with the latest fads and quick-you-have-to-try recipes. Preserving corn-on-the-cob is frequently a topic. I’ve heard two new corn “ideas” this year. While neither are “unsafe”, the quality of the final products may not be so great.

One of these  methods is freezing corn cut off-the-cob  in a mixture of water, sugar and salt in lieu of blanching. There is no research to prove that this sugar and salt brine would be a substitute for heat to inactivate enzymes.

Another  “tip” going around is to put the corn directly in the freezer (husks and silk and all). This method obviously doesn’t include blanching either.  For my personal thoughts on cooking in the husks see an earlier blog post Shucks with the Husks .

If you’re going to freeze corn, blanching is highly recommended.  This is for quality not safety. Blanching inactivates enzymes within the food. If not destroyed,  these enzymes can cause loss of flavor, color and texture in the frozen food. Blanching is scalding vegetables in boiling water or steam for a short time and the immediately cooling in ice water.  Without blanching you may have a very poor quality product.

Fresh sweet corn may be frozen cut-off or on-the-cob. I usually tend to avoid frozen corn-on-the-cob because sometimes it’s mushy, watery and “cobby” tasting  when cooked. If you really love eating corn from the cob, here are some tips that can help you be successful:

According to the National  Center for Home Food Preservation  http://nchfp.uga.edu/how/freeze/corn.html medium ears of corn should be blanched for 7 minutes. One of the key steps to keep this corn from tasting like the cob when thawed is to leave them in the ice water and even adding more ice to completely chill the cobs after blanching.  The general “rule of thumb” is to chill the corn for as long as it was blanched. Don’t allow it to stay too long or it will get soggy and allow to drain well before freezing. Another tip to get better quality results is to slightly thaw the corn-on-the-cob before cooking.

I usually suggest to people to try freezing a few ears and then prepare and see if you and your family likes them before getting carried away and using a lot of freezer space on something you won’t like come January.

Here are a few more tips from Chef Judy Doherty to savor your favorite foods this summer:

  1. Berries can be frozen in zip bags so they are ready for smoothies, muffins, pies, sauces/purees, and cobblers. Mix them for a fun new flavor sensation or keep them separate.
  2. Tomatoes can be cooked into sauce or salsa and frozen in a zip storage bag.
  3. Herbs can be made into pesto or frozen in tupperware so they can be slipped into your favorite foods and dishes. To make a simple pesto, puree your favorite herbs with a little olive oil then freeze on foil, slice and freeze the squared in a zip storeage bag.
  4. Corn should be steamed and then cut off the cob for the best results. Or just cut it off the cob and then steam before freezing. The problem with freezing a whole cob is that you will overcook your corn trying to heat the whole cob.
  5. For peaches and tree fruits, cut them into wedges, freeze on a sheet, then put them into zip bags.
  6. Spinach and other greens may be flash steamed (steam quickly) and then stored in zip bags or plastic containers in small serving sizes.
  7. If you have a lot of fresh mint consider freezing it in ice cubes so you can flavor water or tea.
  8. Grate zucchini and carrots and freeze them in ziplock bags so they are ready for muffins and quick breads.

Cheryle Jones Syracuse, MS
Professor Emeritus, The Ohio State University


Check out our new materials now at