Fresh Local Corn–Enjoy While You Can

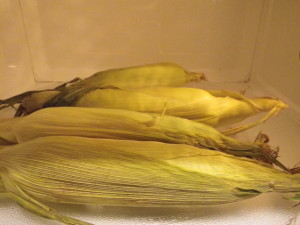
We all know that local corn-on-the-cob tastes the best. One of the reasons is that corn’s natural sugars change quickly after harvest causing the corn to lose its sweetness quickly. Corn is one of those great summer farm market treats.

When selecting sweet corn look for husks with good bright green color that are snug to the corn ear and the silk dark brown. Avoid silk with worms or decay. Select ears that are full of kernels. These kernels should be well developed and plump, tender and milky.  If they are too large or too dark they can be tough, chewy and pasty.

For best quality, store corn in the husks uncovered in the refrigerator. If you have corn without the husks, put them in a perforated plastic bag. Corn is best when eaten within two days. After removing the husks and silk, wash the corn in cool running water before eating, cooking or preserving.

Nutritionally corn is a good source of carbohydrates as well as small amounts of Vitamins A and C.  It is sodium-free and low in fat.  Depending upon the size, corn can yield 2/3 to 1 cup of corn per ear. One medium ear of corn contains about 90 calories. Corn provides folate and thiamin as well as fiber.  It can also be a source of zeaxanthin, an antioxidant that may protect against age-related eye disease, such as macular degeneration.

Even though corn is a starchy vegetable, it can still fit into a healthy balanced diet.  According the 2015-2020 Dietary Guidelines for Americans we should try to eat 2-2 1/2 cups of vegetables each day and this can include 5 cups of starchy vegetables a week. https://health.gov/dietaryguidelines/2015/guidelines/appendix-3/ The key here again is balance and moderation and an occasional ear of corn-on-the cob when it’s fresh adds variety.

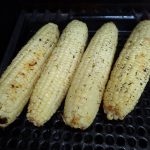
Instead of the traditional boiled and slathered with butter and salt corn-on-the-cob, try roasting on the grill with a little olive oil. I recently placed husked corn in a zip-top bag with a small amount of olive oil and added an herb blend. I turned the bag over several times to coat the ears with the oil and seasoning.   Then I took the cobs out of the bag and placed the cobs directly on a hot grill turning them several times until the kernels were slightly charred and golden. The flavor was great and there was no need to add extra salt or butter. Do be careful to watch the corn as it cooks, you don’t want it to overcook and dry out.

Judy’s favorite method for grilled corn is to start in the microwave and then finish on the grill at the same time the other items are cooking. That keeps it sweet and from getting tough and burnt. She cooks it in husks or in a covered dish for 2 minutes per ear. See her recipe below for corn salad using leftover cooked corn.

Cheryle Jones Syracuse, MS
Professor Emeritus, The Ohio State University

Here is one of Food and Health Communication’s Favorite recipes for corn:

Fresh Corn Salad

Serves: 4 | Serving Size: 1 cup
Total Time: 15 min | Prep: 15 min | Cook: 0 min

Ingredients:

6 cups dark green lettuce, preferably red leaf
2 ears of corn, shucked and cooked
1 large, ripe tomato
1/2 medium-sized, ripe avocado
1 tablespoon olive oil
2 tablespoons flavored vinegar
Black pepper to taste

Directions:

Cut the lettuce into bite-sized pieces and soak in a large amount of cold water; allow to stand so the dirt sinks to the bottom. Drain the lettuce well in a colander. Place the lettuce in a salad bowl.

Cut the corn off the cob and place on top of the lettuce. Core and dice the tomato and place on top of the salad. Cut the avocado in half, remove the pit and scoop out the flesh from the rind. Dice the avocado and place it on top of the salad.

Chill and cover the salad until ready to serve, up to 3 hours.

When ready to serve, drizzle oil and vinegar over the top and add black pepper to taste.

Serves 4. Each 1 cup serving: 148 calories, 8g fat, 1g saturated fat, 0gtrans fat, 0mg cholesterol, 18mg sodium, 20g carbohydrate, 4g fiber, 4gsugars, 4g protein.© Food and Health CommunicationsAnother article in the blog on Corn-on-the-Cob

Shucks with the husks

Freezing the Taste of Summer

One of the great tastes of summer  is corn-on-the-cob. Lots of people try to retain that great flavor for later in the year by freezing corn when it’s at its peak.

People are always looking for quick and easy ways to do things and the internet tends to perpetuate this with the latest fads and quick-you-have-to-try recipes. Preserving corn-on-the-cob is frequently a topic. I’ve heard two new corn “ideas” this year. While neither are “unsafe”, the quality of the final products may not be so great.

One of these  methods is freezing corn cut off-the-cob  in a mixture of water, sugar and salt in lieu of blanching. There is no research to prove that this sugar and salt brine would be a substitute for heat to inactivate enzymes.

Another  “tip” going around is to put the corn directly in the freezer (husks and silk and all). This method obviously doesn’t include blanching either.  For my personal thoughts on cooking in the husks see an earlier blog post Shucks with the Husks .

If you’re going to freeze corn, blanching is highly recommended.  This is for quality not safety. Blanching inactivates enzymes within the food. If not destroyed,  these enzymes can cause loss of flavor, color and texture in the frozen food. Blanching is scalding vegetables in boiling water or steam for a short time and the immediately cooling in ice water.  Without blanching you may have a very poor quality product.

Fresh sweet corn may be frozen cut-off or on-the-cob. I usually tend to avoid frozen corn-on-the-cob because sometimes it’s mushy, watery and “cobby” tasting  when cooked. If you really love eating corn from the cob, here are some tips that can help you be successful:

According to the National  Center for Home Food Preservation  http://nchfp.uga.edu/how/freeze/corn.html medium ears of corn should be blanched for 7 minutes. One of the key steps to keep this corn from tasting like the cob when thawed is to leave them in the ice water and even adding more ice to completely chill the cobs after blanching.  The general “rule of thumb” is to chill the corn for as long as it was blanched. Don’t allow it to stay too long or it will get soggy and allow to drain well before freezing. Another tip to get better quality results is to slightly thaw the corn-on-the-cob before cooking.

I usually suggest to people to try freezing a few ears and then prepare and see if you and your family likes them before getting carried away and using a lot of freezer space on something you won’t like come January.

Here are a few more tips from Chef Judy Doherty to savor your favorite foods this summer:

  1. Berries can be frozen in zip bags so they are ready for smoothies, muffins, pies, sauces/purees, and cobblers. Mix them for a fun new flavor sensation or keep them separate.
  2. Tomatoes can be cooked into sauce or salsa and frozen in a zip storage bag.
  3. Herbs can be made into pesto or frozen in tupperware so they can be slipped into your favorite foods and dishes. To make a simple pesto, puree your favorite herbs with a little olive oil then freeze on foil, slice and freeze the squared in a zip storeage bag.
  4. Corn should be steamed and then cut off the cob for the best results. Or just cut it off the cob and then steam before freezing. The problem with freezing a whole cob is that you will overcook your corn trying to heat the whole cob.
  5. For peaches and tree fruits, cut them into wedges, freeze on a sheet, then put them into zip bags.
  6. Spinach and other greens may be flash steamed (steam quickly) and then stored in zip bags or plastic containers in small serving sizes.
  7. If you have a lot of fresh mint consider freezing it in ice cubes so you can flavor water or tea.
  8. Grate zucchini and carrots and freeze them in ziplock bags so they are ready for muffins and quick breads.

Cheryle Jones Syracuse, MS
Professor Emeritus, The Ohio State University


Check out our new materials now at 

Keeping Bread Fresh

I bet everyone, at one-time-or-another, thrown a loaf of bread or an extra bag of hot dog buns directly into the freezer in the store wrapper.  Then a few weeks later wondered what happened  and why it was crumbly, dry, tasted like the inside of the freezer and was basically inedible.

Easy answer: freezer burn.

This is the process of food drying out inside the freezer. This usually happens if the food has been improperly wrapped.  Cold moving air inside the freezer is your enemy when it comes to the quality of the food once thawed.  This air can get into inappropriate containers and wraps and causes the food to be dehydrated, develop off-flavors along with other quality and texture changes.

Bread is a perishable product. The main problem with bread is that it becomes stale and may develop mold.   In general, commercial breads can be kept in a cool dry place (like the pantry, kitchen counter or bread drawer) for two to five days. Homemade breads and those commercially made without preservatives have a shorter shelf life.

You can put bread in the refrigerator to inhibit mold growth, but this tends to speed staling. 

 Freezing bread is generally the best alternative for storing bread for longer than a few days. Staling and  mold growth will be slowed or halted in the freezer.  The  main thing to remember is that it should be wrapped well. Just putting it in there in the bag it came in from the store is asking for failure.  Bread wrappers are not sufficiently moisture-vapor resistant to be used for freezing.  Well wrapped bread keeps in the freezer for two to three months.

Bread should be removed from the store wrap and placed in what they call moisture and vapor proof packaging. This packaging will not become brittle or crack at low temperatures and keepd that damaging air out. This packaging will also protect foods from absorbing off-flavors or odors.

What is a good wrap? Specifically developed freezer paper is good.  Heavy-duty aluminum foil also works well. Another good way to package bread is in zip-top freezer bags.  These allow you to take out just what you need and keep the rest frozen.

A few kitchen hacks to keep bread fresher longer:

  • I wrap my bread in two slice packs inside the freezer bag, just right for a sandwich or easy to separate if I only want one piece.
  • I slice English muffins and bagels before freezing and separate the layers with plastic wrap. That way if I only want half a muffin I can easily take out just one half and keep the rest frozen.
  • I do the same with bagels. Cut them in half and then in quarters and separate the pieces as I wrap. That way if I only want half a bagel I get both a top and bottom and not just the boring bottom half.
  • When purchasing loaves of bread from a store it is always better to get the bakery to pre-slice them on a machine for you. Then you can wrap the slices into 2 serving packets or double bag them all if you are going to use them up fast.

Thawing a piece or two of frozen bread only takes a few minutes on the counter.  Individual slices, bagels  or English muffins can go straight into the toaster.

One last thing. What about if the bread does become moldy, should you just cut it off and use it anyway?  NO.  Bread is porous allowing molds to quickly and easily spread. It may be contaminated with toxins deeper than you can see. Moldy bread should be pitched.

Cheryle Jones Syracuse, MS
Professor Emeritus, The Ohio State University

Check out our new materials now at 

Grill it safely

I recently went to a large outdoor family event where lots of hamburgers were being cooked on grills.  Was there a food thermometer in sight?

Nope.

I really don’t understand why people are so resistant to using a food thermometer when cooking. The only way to be sure that meat is cooked to a high enough internal temperature to destroy any harmful bacteria is with a thermometer.  This means on the grill, too. Many folks are not in the habit of using these tools and they are easily forgotten when cooking outside.

A June 27, 2017  news release * from the United States Department of Agriculture’s Food Safety and Inspection Service  says that recent research “found that only 24 percent of the public uses a food thermometer when cooking hamburgers and only 42 percent do so when cooking chicken.” “I’m glad to see that the percentage of people using a thermometer is getting better, a 2002 survey showed that only 6% of cooks used thermometers on burgers.

The safe minimum cooking temperature for ground meats, including beef, pork, veal and lamb, is 160 degrees.  If you have turkey or chicken burgers they should be cooked to an internal temperature of 165 degrees.  If you’re making steak or pork chops they only need to be cooked to 145 degrees.

While many folks use it as a guide, color is not a good indicator for doneness of ground beef.  If raw ground beef is somewhat brown to start with, it may look fully cooked before it reaches a safe temperature. Conversely, some burgers may still be pink and have already reached a safe temperature.

You may ask: “why are there different temperatures for steak and ground beef?”  The pathogen of concern here is E.coli and the problem is with the grinding. If there are any bacteria on the surface of the meat it will be mixed in when the meat is ground. On-the other hand, when a steak is placed on a grill or under the broiler, any bacteria that may be on the surface is destroyed by the high heat.

Chicken and other poultry are usually associated with the bacteria called salmonella. It takes a little higher temperature to destroy this, so that’s why all chicken or other poultry should be  cooked to a minimum internal temp of 165 degrees F.

The take-home message:  if you don’t have a food thermometer—think about buying one.  If you already have one, please dig it out and use it. It takes the guess work out of cooking meats and lets you have confidence that the meat you’re serving will not make someone sick.

Cheryle Jones Syracuse, MS

Professor Emeritus, The Ohio State University

*https://www.usda.gov/media/press-releases/2017/06/27/fsis-provides-pro-grilling-tips-summer-barbecues

Teachable Moments

Educators call lessons learned in real life “teachable moments.” That’s the time that is just right for someone to learn something.

Wouldn’t you think that would be true with food safety? Especially when it’s related to cooking.

Cookbooks and on-line recipes could be a really good source of food safety information.  Putting the appropriate information—like cooking temperatures, cross contamination risks or storage times — right into a recipe would provide the cooks the info right when they need it.

This seems so simple. But it’s not being done. A study at North Carolina State University, that was recently published in the British Food Journal* looked at cookbooks and the advice they gave about food safety. The researchers evaluated a total 1,497 recipes from 29 cookbooks that appeared on the New York Times best sellers list for food and diet books.

One thing they specifically looked at was if a recipe did tell the reader to cook the food to a specific internal temperature. In other words—did they encourage the use of a food thermometer?

They also looked to see if the recipe perpetuated food myths. Some of these were cooking poultry until the “juices run clear” or hamburger until it is brown.  Both of these are unreliable for determining if the food has reached a safe temperature.

Some of the cookbooks recommended cooking temperatures. Yeah!  But not very many—only 8% or 123 of the recipes reviewed even mentioned a temperature.  But unfortunately not all of these temperatures were right. So even if a person followed the recipe exactly they may not be cooking the food to a high enough temperature reduce the risk of a foodborne illness.

Overall, only 89 out of 1,497 recipes gave readers reliable information that they could use to reduce their risk of foodborne illness.

This isn’t new info. A similar study was done about 25 years ago, and found similar results. So nothing really has changed in the past quarter of a century.

Ideas for educators:

  • put minimum cooking temperatures into recipes that you share with students
  • when doing food demonstrations use and explain good food safety practices including hand washing, heating to a proper temperature quickly, refrigeration or ice chests to keep cold food cold, avoiding cross contamination on cutting boards and with utensils, and using a food thermometer when appropriate
  • don’t use vague terms such as “cook till done” or “bubbly inside” to describe when a food is done; explain the process like cook chicken until the juices run clear and the internal temperature is 165 degrees F.
  • offer storage tips for finished products like refrigerate in shallow pan immediately

Here is one example from foodandhealth.com

Chili on The Grill

Serves: 4 | Serving Size: 1/2 cup
Total Time: 20 min | Prep: 5 min | Cook: 15 min

Ingredients:

2 cups cooked pinto beans
1 cup cherry tomatoes
1/2 onion chopped
1/2 bell pepper chopped
1/2 jalapeno, chopped fine (no seeds)
Dash of cumin
Dash of chili pepper
Dash of dried oregano
Drizzle of olive oil
Juice of 1 lime

Directions:

Place all items, except for the lime, on foil with the drizzled olive oil. Place on preheated grill of 400 degrees F. Grill until the beans are heated through and the veggies are caramelized and tender, about 15-20 minutes. Sprinkle with lime juice.

Serve the beans and vegetables with grilled chicken that is cooked to an internal temperature of 165 degrees F and steamed brown rice. A side salad is great, too! Serve all food hot immediately. Refrigerate leftovers immediately.

Serves 4. Each 1/2 cup serving: 172 calories, 4g fat, 1g saturated fat, 0g trans fat, 0mg cholesterol, 8mg sodium, 27g carbohydrate, 9g fiber, 2g sugars, 8g protein.
© Food and Health Communications

Cheryle Jones Syracuse, MS
Professor Emeritus, The Ohio State University

*Katrina Levine, Ashley Chaifetz, Benjamin Chapman, (2017) “Evaluating food safety risk messages in popular cookbooks”, British Food Journal, Vol. 119 Issue: 5, pp.1116-1129, https://doi.org/10.1108/BFJ-02-2017-0066

Here is our food safety temperature poster:

Check out our new materials now at 

Easter Candy and Your Health

Easter is the second biggest candy holiday in the United States.* According to the National Confectioners Association (NCA), over 120 million pounds of Easter candy is purchased each year. This includes 16 billion jelly beans, 90 million chocolate bunnies, and an untold number of marshmallow peeps.

That’s a lot of sugar!

Moreover, according to research from the NCA, 87% of parents will make Easter baskets for their children this year. It’s also interesting to note that 81% of these parents will then steal candy from their children’s baskets.

So, what are parents usually putting in Easter baskets?

  • 89% say Easter candy and chocolate
  • 79% include non-edible items like crayons, stuffed animals, books, and movie passes
  • 46% add candy with “added benefits” like dark chocolate or chocolate with added fruits and nuts
  • 44% fill the baskets with what they call “heathier snacks” such as granola bars or dried fruit
  • 35% include gums and mints

How about you and your clients?  How do you fill the baskets?

That stash of Easter candy can easily put everyone in the family over their recommended sugar intakes for the day. Remember, the Dietary Guidelines for Americans assert that people should “Consume less than 10 percent of calories per day from added sugars.”

Perhaps it’s time to think outside the jelly bean.

A full 11% of the families surveyed by the NCA didn’t add any candy to their baskets, so I’m not being unrealistic when I say it can be done. Although candy is part of Easter traditions, consider at least limiting the amount and types of candy you put in the basket. I do like the idea of chocolate with “added benefits” like nuts. Other healthful food ideas include some 100-calorie snack packs, nuts, dried fruits, little boxes of raisins, and trail mix.

There are lots of suggestions online for non-edible items like marking pens, money, stickers, and toys. Our own Chef Judy has some great ideas for non-candy items that could also promote physical activity and healthful eating. How about replacing at least some of those jelly beans or marshmallow peeps with:

  • Noodles for the pool
  • Jump ropes
  • Balls
  • Bubble supplies with big wands
  • Colorful athletic shoes
  • Activity passes for fun things to do in the area
  • Family board games
  • Pool towels and swim goggles
  • Athletic clothes
  • Frisbees
  • A healthful cookbook
  • Cooking equipment for foodie kids
  • A new reusable water bottle

Anything that gets the kids and family outside and moving or interacting together makes a great stuffer for an Easter basket, and they’ll last longer than candy too!

So, what will you be putting in your baskets this year?

By Cheryle Jones Syracuse, MS, Professor Emeritus at The Ohio State University

* Halloween is the first.

And here are some other fun prizes that you can put into Easter baskets…

Easter Eggs: What You Need to Know

Eggs are a fun and traditional Easter staple. Did you know that at one time they were banned during Lent and became a treat to eat on Easter? Eggs also symbolize fertility and renewal. They are associated with the end of winter and the coming of spring.

Here’s another bit of egg trivia: the average person consumes one-and-a-half dozen eggs at Easter, and the average family eats about four dozen eggs during the holiday.

It’s always fun to color Easter eggs, but remember that these eggs should not be left at room temperature for longer than two hours. If you’re thinking of having an egg hunt, it would be safer to use plastic eggs instead of real eggs. Why? Well, if the shells are cracked, then they can easily be contaminated by dirt and moisture from your yard. Plus, there’s always the concern that the hunt will take longer than two hours.

And speaking of food safety, if you are putting colored eggs into a braided bread or Easter pastry, remember to eat or refrigerate the pastry within 2 hours of pulling the pastry out of the oven. If you plan to store it for longer, then you can keep the pastry in the refrigerator for three to four days.

The food safety fun doesn’t end there!

For some families, pickled eggs are an Easter tradition. This usually involves placing hard-cooked eggs into a vinegar or pickled beet solution. Despite the pickling, these eggs should still be refrigerated. Use pickled eggs within seven days of preparing them.

And finally, the week after Easter is often considered “egg salad week” because one the most popular ways to use up all those hard-cooked eggs is by making egg salad. Remember, hard-cooked eggs should be kept refrigerated and eaten within seven days of cooking.

Now let’s talk about preparing the tastiest and prettiest Easter eggs.

The green ring that sometimes appears around the yolk of a hard-cooked egg is usually caused by hard boiling and over cooking. This is the result of a reaction between the sulfur in the white and iron in the yolk, which interact when combined with high heat. This green part is safe to eat — it’s just a little unappetizing. For best results, try this method instead:

Recipe: Hard-Cooked Eggs

For a kinder and gentler way to cook eggs, place them a pan and fill it with cold water until you have about  1” covering the tops of the eggs.

Bring everything to a full boil, put a lid on the pan, and then take it off the heat. Set a timer and let the pan stand for 12 minutes (for large eggs) to 15 minutes (for extra-large eggs).

When the time is up, drain the pan and cool the eggs under cold running water or in an ice bath.

Refrigerate when cool.

Not only does this method eliminate the green ring, the whites will be less rubbery! Plus, this approach helps prevent the shells from cracking. Remember, eggs are easiest to peel right after cooling.

And speaking of peeling, did you know that the fresher your eggs are, the harder they’re going to be to peel when cooked?

This is because the airy space between the shell and the egg itself increases as an egg ages. The shell becomes easier to peel as this air space increases. If you want eggs that will peel more easily, buy them a couple weeks before Easter and keep them in the fridge.

Shopping Tip: Eggs are usually on sale close to Easter. This may be a good time to buy a couple extra dozen. The “use by” dates on the egg cartons indicate the date before which the eggs should be eaten for best quality, not food safety. Usually eggs can be safely eaten for 2-3 weeks beyond the sell-by date. That said, eggs should be refrigerated at the store, so avoid displays of eggs that are not kept cold.

I hope these tips and tricks come in handy as you prepare your spring celebrations!

By Cheryle Jones Syracuse, MS, Professor Emeritus at The Ohio State University

Activity Idea: Teaching Food Safety

I don’t watch television cooking shows very often, because their food safety practices usually upset me.

I once watched a popular show (the hostess is a household name that I won’t mention) and spotted at least three things that I would consider food safety problems — these included unsafe recipes for food preservation and cooking temperatures that were just WRONG.

I’m not the only one who is concerned about these shows and what they are teaching (or not teaching) their audiences.  Back in 2004, a research project looked at over 60 hours of cooking shows. They spotted an unsafe handling practice every four minutes. More recent research studies have shown similar results.

It isn’t getting better.

All of the studies documented a lack of handwashing, cross-contamination between raw and ready-to-eat food, and not using a thermometer to ensure that the foods have been cooked properly.

Other unsafe practices spotted include: fly-away-hair, chipped nail polish, potential contamination with wiping cloths, not washing produce, touching ready-to-eat food with bare hands (combined with inadequate handwashing), sweating onto food, touching hair, licking fingers, double dipping with tasting spoons, and eating while cooking.

One of the studies noted that — not surprisingly — only 13% of the shows they watched mentioned any type of food safety practice.

While I know that these shows are produced primarily for entertainment, I wish they would do a better job of modeling good food safety procedures.  They have the opportunity to teach millions of viewers, but they don’t.

So I had an idea for those that teach food safety.

Have your students watch a few of these shows and note the unsafe practices. Perhaps you could watch a few together and then discuss what they saw and why they identified those items. Have them check too for any good practices or mention of food safety too.

They’ll never look at a cooking show the same way again.

By Cheryle Jones Syracuse, MS, Professor Emeritus at The Ohio State University

References:

  1. Mathiasen, L.A., Chapman, B.J., Lacroix, B.J. and Powell, D.A. 2004. Spot the mistake: Television cooking shows as a source of food safety information, Food Protection Trends 24(5): 328-334.
  2. Nancy L. Cohen, Rita Brennan Olson. Compliance With Recommended Food Safety Practices in Television Cooking Shows. Journal of Nutrition Education and Behavior, 2016.
  3. Curtis Maughan, Edgar Chambers, Sandria Godwin. Food safety behaviors observed in celebrity chefs across a variety of programs. Journal of Public Health, 2016.

And here are a few fantastic resources for National Nutrition Month!

Feeding Baby Safely

One of our Food and Health Communications team members is expecting her first baby in the next few months, and we all have babies on the brain! Mom’s milk or formula will be the mainstay of baby’s diet for the first several months, but by four to six months, the baby’s energy needs may increase and solid foods may be recommended.

Don’t rush to add solid foods! Until this age, babies usually don’t have the control over their tongue and mouth muscles to enable them to safely eat solid foods.

Here are a few key points for keeping baby’s food safe:

  • Never give babies dairy products made from raw or unpasteurized milk, as they may contain bacteria that could cause serious illness.
  • Do not give honey to babies who are under a year old. This can put the baby at risk for botulism. This includes baked goods or other foods that contain honey,
  • Don’t give babies raw or partially-cooked eggs. This includes soft-cooked eggs or poached eggs with “runny” yolks. The yolks and whites should be firm. Serve only the yolks to babies less than one year old, because egg whites may cause an allergic reaction.
  • Don’t serve babies mixed-ingredient foods until they’ve had all the individual ingredients separately. This will help you to makes sure that they are not allergic to the individual foods. According to the American Academy of Pediatrics, it doesn’t matter what solid foods are offered first. Many doctors recommend cereals first and often suggest rice cereal because it is not likely to cause food allergies.
  • Don’t give babies unpasteurized fruit juices.
  • If heating baby food or milk in the microwave, make sure to stir it to ensure that there are no “hot spots” within the food so that you don’t burn the baby.

And here are a couple other basic thoughts on feeding baby:

  • Do not allow food or formula to stay at room temperature for more than two hours. This is enough time for any bacteria that may be in that food to multiply to unhealthy levels.  Start off with small amounts of solid foods and throw away any uneaten food from the baby’s dish — don’t save it for another meal.
  • Remember, a baby’s immune system has not developed and they are more at risk for foodborne illness than older children or healthy adults.

By Cheryle Jones Syracuse, MS, Professor Emeritus at The Ohio State University

Here are some other wonderful resources for feeding babies, kids, and families…

And here are a few more great options for Nutrition Month!

Keeping Fruits and Vegetables Safe to Eat

Here’s a quick food safety question for you: which of these foods needs to be refrigerated for best food safety?

  • Cut watermelon
  • Washed and cut leafy greens
  • Sliced tomatoes
  • Freshly-cut cantaloupe cubes
  • Fruit salad

If you answered ALL of them, then you would be correct.

While many people don’t consider these items risky — after all, we often leave whole fruits and vegetables at room temperature for storage or to ripen further — once cut, all fruits and vegetables need to be refrigerated for safety.

Once a fruit or vegetable has been cut, the barrier to the outside world has been broken and the plant’s natural defenses have been compromised. This opens the food up to the environment. Plus, the moisture and natural sugars in fruits and vegetables help create a great place for bacteria to grow. Refrigerator temperatures, on the other hand, can help slow this development of bacteria.

Other foods that are quite often forgotten are things like smoothies and juices. These drinks should be consumed within two hours or refrigerated. Just like with cut fruit, with smoothies and juices you’ve disrupted the cell structure by blending or squeezing, which in turn makes them more susceptible to bacteria development.

Another way to help prevent bacteria growth on fruits and vegetables is to wash them carefully — even if you’re not going to eat the outside. There could be bacteria on the skin or rind and it can be dragged across the moist flesh of the food during your preparation. This additional bacteria on the inside of the food can just add to potential problems if left at room temperature.

Always remember to wash your hands, countertops, and cutting boards before and after cutting fresh fruits and vegetables. Take care to avoid cross-contamination with raw meats, poultry, and seafood.

The same caution should be taken with cooked fruits and vegetables.  Once they’ve been heated, the cell structure has been broken down, making it an ideal setting for pathogen development.

Here’s the key take-home message: Once cut, cleaned, peeled, chopped, blended, or cooked, all fruits and vegetables should NOT be kept at room temperature for more than two hours. Refrigerate them for safety.

By Cheryle Jones Syracuse, MS, Professor Emeritus at The Ohio State University

The Nutrition Month preparation fun continues in the Nutrition Education Store! Check out these great materials…