It seems so simple.
 There are four basic steps to food safety: wash, separate, cook, and refrigerate. Today I’m focusing on cook.
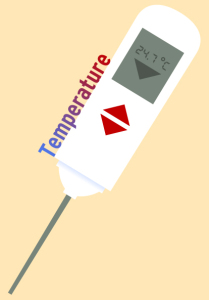
This recommendation seems simple to me: “cook food to a proper internal temperature and use a food thermometer.” So, why is it so hard?
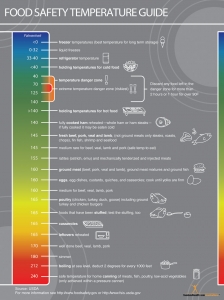
Let’s take a minute to explore what preparing food safely actually entails. A couple of months ago, Judy Doherty, founder of Food and Health Communications, asked me to help her develop a food safety temperature poster. She was looking to do something specifically about food temperatures. We started at 0 degrees Fahrenheit (freezer temperature) and went all the way up to 240 degrees (pressure canning). Although it may seem predictable, filling the space in between wasn’t so easy.
I teach a lot of restaurant food safety, so the first reference I want to was the Food and Drug Association’s (FDA) Food Code. In it, they list the recommended minimum internal cooking temperatures for food service. So far so good. But then I looked at the United States Department of Agriculture and found a different chart for minimum internal temperatures. This one was designed for consumers. All the recommended temperatures were the same or higher than the food code temperatures. That’s a little confusing. If there really is one “proper internal temperature,” then how can these differ?
I talked with a consumer adviser from the USDA’s Meat and Poultry Hotline and asked about this difference. The response was that their information was designed for consumers who cook at home. This makes the authors of the chart more conservative than they are with food code guidelines. I can understand this, since restaurant and food service folks have standard operating procedures for food safety that are not found in most homes.
After my call, I went to the National Turkey Federation to confirm the recommended internal temperatures for poultry. In checking several recipes, I found at least three different temperatures for roasted turkey. On their website, the National Turkey Federation does a nice job explaining the rationale for these differing temperatures, saying:
“The FDA recommendations are for safety-temperatures at a sufficient level to kill bacteria that may be present. Our own recommended temperatures are somewhat higher in many cases. We have chosen these temperatures because we believe they will enable you to achieve optimum quality. In addition, turkey will be easier to carve or slice when heated/cooked to these temperatures.”
OK. This makes sense. When in doubt, use the higher temperature. Here is the USDA information:
Safe Minimum Internal Temperature Chart
Safe steps in food handling, cooking, and storage are essential in preventing foodborne illness. You can’t see, smell, or taste harmful bacteria that may cause illness. In every step of food preparation, follow the four guidelines to keep food safe:
- Clean—Wash hands and surfaces often.
- Separate—Separate raw meat from other foods.
- Cook—Cook to the right temperature.
- Chill—Refrigerate food promptly.
Cook all food to these minimum internal temperatures as measured with a food thermometer before removing food from the heat source. For reasons of personal preference, consumers may choose to cook food to higher temperatures.
| Product |
Minimum Internal Temperature & Rest Time |
Beef, Pork, Veal & Lamb
Steaks, chops, roasts |
145 °F (62.8 °C) and allow to rest for at least 3 minutes |
| Ground meats |
160 °F (71.1 °C) |
| Ham, fresh or smoked (uncooked) |
145 °F (60 °C) and allow to rest for at least 3 minutes |
Fully Cooked Ham
(to reheat) |
Reheat cooked hams packaged in USDA-inspected plants to 140 °F (60 °C) and all others to 165 °F (73.9 °C). |
| Product |
Minimum Internal Temperature |
| All Poultry (breasts, whole bird, legs, thighs, and wings, ground poultry, and stuffing) |
165 °F (73.9 °C) |
| Eggs |
160 °F (71.1 °C) |
| Fish & Shellfish |
145 °F (62.8 °C) |
| Leftovers |
165 °F (73.9 °C) |
| Casseroles |
165 °F (73.9 °C) |
My concern is not to haggle over a few degrees here or there. My goal as a teacher and writer is to encourage people to use that thermometer. USDA studies show that 65% of consumers use food thermometers on Thanksgiving, but only 3% use them when cooking everyday foods like burgers. Why skip the thermometer?
“Cook” is one of the key steps to food safety. Cooking food so that it reaches a safe internal temperature is crucial to keeping food safe. Using thermometer is the only way to tell for sure whether food has reached a high enough temperature to destroy harmful bacteria.
The bottom line is simple: are your clients using a food thermometer? Do they know the temperature of the food they’re eating and serving?
By Cheryle Jones Syracuse, MS, Professor Emeritus, The Ohio State University
Here is the new food safety temperature chart poster based on USDA temperature guides:
And one on food safety:
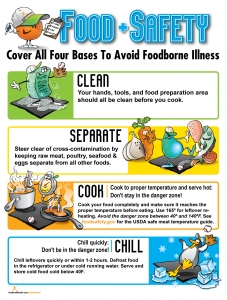
4 Steps of Food Safety Poster
And more great resources!
Cooking Demo Package

Cooking Demo Display Kit